

How To Set A Pressure Switch On A Pump
Pressure switches are designed to automatically sense when the pressure has changed. They are used widely in the Water Well Manufacture equally they are mainly used in systems that have pressurized liquids.
Most pressure switches have the capability of making field adjustments, but some do non. In this blog, nosotros will encompass how to properly arrange a standard pressure switch to ensure the safety of you and your switch. Let's dive in.
Looking for data nigh the different components in a Submersible Pump installation? Check out, A Complete Guide of All Submersible Pump Components Ebook.
Cutting-In and Cut-Out
 All Pressure switches have two operating points known as the cut-in (Reset Betoken) and cut-out (Trip Point) settings. The cut-in point is for the falling force per unit area and the cutting-out betoken is for the rising pressure. Every switch also includes a differential or a range based on the cut-in and cut-out points. Both the cut-in and cutting-out on virtually switches can be adapted if sure applications require that. For example: if the cut-in is 40 PSI and the cut-out is lx PSI the differential is xx PSI.
Adjustment Tips for a Standard Switch
1. To protect y'all and your switch, the showtime affair to practice is disconnect the power to the switch from the ability supply earlier you attempt to practise any adjustments.
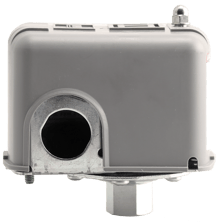
two. After the ability is disconnected, measure and write down the distance from the .png?width=425&name=My%20Post(23).png) exposed thread from the superlative of the nut to the top of the stud that you lot are adjusting. Write it in fractions of an inch or mm, this is in case you need to kickoff over and then then yous know where you started.
exposed thread from the superlative of the nut to the top of the stud that you lot are adjusting. Write it in fractions of an inch or mm, this is in case you need to kickoff over and then then yous know where you started.
3. The get-go adjustment you should make is to the cut-in and cutting-out settings. Once you take made the desired adjustments to those, you can adjust the differential as a secondary aligning. As you can meet in the picture show, the larger nut adjusts the cutting-in, the smaller nut adjusts the range.
4. There should be only 3 plow per nut maximum, either up or down each time.
To learn more nigh Pressure level Switches and the different types available, check out our Webinar, An Essential Guide to Understanding Pressure Switches.
Adjusting the Cut-In
In order to increase or decrease the cut-in or the cut-out setting you will need to use a 3/8" nut driver or socket to adapt the switch, while all the same maintaining the same differential. To exercise this, follow the below.
1. Rotate the range nut in a clockwise direction for higher cut-in force per unit area and counter clockwise for lower cutting-in force per unit area. Note: changing these settings DOES Non change the differential.
2. As yous outset to change the cutting-in value, the cut-out value will change past the same corporeality and in the aforementioned direction. For an example, if you increase the cut-in pressure by 10 PSI it volition also increase the cutting-out pressure by 10 PSI, saving yous from having to adjust the cut-out value as well.
Monitoring is Important
You should and then monitor the system closely to ensure the pressure setting is what you lot desired. Note that the adjustment y'all brand to the pressure level switch can only be read after the pump has reached its commencement adjusted close off. The adjacent cut-in and cut-off pressure is your new setting.
1. By opening the boiler bleed or sediment faucet yous tin can drain the water from the pressure system until the pressure drops below what the current cut-in point is and and then the pump turns on.
2. Y'all can then turn the faucet off.
iii. The system'south pressure should then be monitored equally the pump builds force per unit area and fills the tank. Proceed a close middle on the pressure level gauge so that you can identify the exact bespeak that the pump turns off.
4. Lastly, you tin repeat adjustments if necessary and continue monitoring for a couple more cycles. Repeat adjustments and monitor until you lot attain the setting you require.
One thing to go along in mind, when lowering the pressure level setting, near bladder tank water systems are designed for the pressure to be 2 PSI below the cut-in point when there is no water in the tank. Another matter to continue in mind is the differential cannot be adjusted beyond the minimum and maximum differential that is published for the switch.
Is the Switch Tripping?
If y'all are finding that the switch is tripping the cut-in pressure is near likely as well shut to the tank pre-charge. A departure of a minimum of 2-v PSI is required to ensure the switch won't trip. For example, if the switch cut-in is 40 PSI then the tank pre-charge should be 35-38 PSI maximum.
Another gene that y'all should consider is the switches are not individually tested which ways if you become a switch that is 30-l PSI information technology could possibly exist 28-48 PSI. Pressure switches could also stick sometimes, so it could possibly come on i or iii PSI dissimilar from one wheel to the next. Ambient pressure level tin can as well heighten the pre-charge in the tank. These are just somethings to be aware of.
Keep these tips and steps in mind the side by side fourth dimension you demand to brand an adjustment on a pressure switch. But continue in mind, adjustment steps may be slightly different from one switch to another depending on whether y'all accept a standard switch or for example a low force per unit area switch. It is e'er good to await into what switch you accept and research if in that location are specific steps yous should be doing for that switch.
Have further questions about this subject?

Caput over to Boshart's Noesis Base: technical production information, guidelines, and more than.
Source: https://blog.boshart.com/how-to-properly-adjust-your-pressure-switch
0 Response to "How To Set A Pressure Switch On A Pump"
Post a Comment